home about contact recipe index faqs

Wednesday, November 27, 2013

Apple Cranberry Puffed Oven Pancake


Puffed oven pancakes go by many names: puffed pancake, oven pancake, Dutch baby, and German pancakes. I was first introduced to them when I married my husband. In their family they are known as German pancakes, and are a traditional breakfast. It's a nice variation from pancakes, because you can whip it up and then let it bake, without worrying about the pouring and flipping that traditional pancakes require. They are also quite a bit lighter than traditional pancakes, and so are great when you want a "fancier" breakfast that doesn't leave you feeling too full.

There are a number of recipes out there  - each one differing slightly from the other in how thick, moist, etc. it is. In our house, we have two recipes that we use, depending on if I'm cooking them or if my husband is. My preferred recipe comes from the Better Homes and Gardens Our Best Recipes cookbook. It's super simple, goes easy on the butter, and comes out a little more crispy around the edges (which I like). Although these can be cooked plain and then topped with any variety of toppings, I've also discovered that certain toppings can be baked in with the pancake, adding fun flavor and warm textures. I created this version last weekend, and loved the result! The apples and cranberries made it pretty, yummy, and flavorful enough that it stood all on its own without any extra syrup or other sugary toppings, although it would be wonderful with applesauce or lightly sweetened yogurt. I'm thinking this will be a perfect breakfast for Thanksgiving morning - fancy and fun, but still simple and light!


Apple Cranberry Puffed Oven Pancake
4 SERVINGS 
PREP: 10 minutes           COOK: 20 minutes            READY IN: 30 minutes


  SIMPLE         HEALTHY      YUM
pic name       pic name      pic name

INGREDIENTS


  • 2 tablespoons butter
  • 3 eggs
  • 1/2 cup all-purpose flour
  • 1/2 cup milk
  • 1/4 teaspoon salt
  • 1 apple, cut into 1/4 inch rounds
  • 1/4 cup fresh cranberries
  • sprinkle of cinnamon

DIRECTIONS


  1. Preheat oven to 400ºF. Place butter in an ovenproof skillet or pie tin. Put in the oven for 3-5 minutes, until the butter is melted.
  2. Meanwhile, in a medium bowl beat the eggs, flour, milk, and salt together until smooth. Pour the batter into the hot skillet with the melted butter. Top with apple rounds and cranberries. Sprinkle with cinnamon.
  3. Bake for 20-25 minutes, until the sides of the pancake are puffed up and slightly browned.
  4. Cut into quarters and serve. 

NUTRITION FACTS


    1/4 of pancake    197 calories   9.8 g fat   20.7 g carbs    6.8 g protein    6.6 g sugar   

Enjoy!
Recipe adapted from Our Best Recipes by Better Homes and Gardens.

Tuesday, November 26, 2013

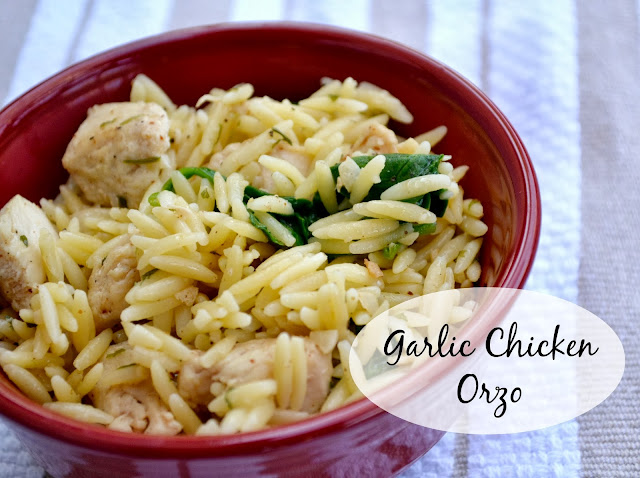
Garlic Chicken Orzo


I have a new favorite ingredient for my recipes: orzo! Don't know what it is? It's like pasta and rice, mixed into one little grain of happiness. Okay, that's a little dramatic. But seriously, orzo is so easy to cook with, and it gives such a good texture and flavor to our dinner. So naturally when we found this garlic chicken orzo we had to try it, and I'm telling you now - it was delicious! I'm not even ashamed to admit that we polished off the entire pan... just the two of us.
Garlic Chicken Orzo
Garlic Chicken Orzo
4 SERVINGS 
PREP: 15 minutes           COOK: 15 minutes            READY IN: 30 minutes


  SIMPLE         HEALTHY      YUM
pic name       pic name      pic name

INGREDIENTS


  • 1 cup uncooked orzo pasta
  • 2 tablespoons olive oil
  • 2 cloves garlic
  • 1/4 teaspoon crushed red pepper
  • 2 chicken breasts, cut into bite-size pieces
  • 1 tablespoon parsley
  • 2 cups fresh spinach leaves
  • Grated parmesan (for topping)
  • Salt and pepper (for topping)

DIRECTIONS


  1. Cook orzo in large pot for 8 to 10 minutes, or until al dente. Drain.
  2. Pour olive oil in medium-high heat skillet. Add garlic and red pepper and cook for 1 minute, or until garlic is golden brown.
  3. Add chicken to skillet. Cook for 3 to 5 minutes, or until chicken is cooked.
  4. Reduce heat to medium, and add parsley and cooked orzo to chicken mixture. Then add spinach. 
  5. Cook for 5 additional minutes, stirring occasionally.
  6. Serve with parmesan cheese.

NUTRITION FACTS


    1 cup serving    462 calories   17.5 g fat   33.2 g carbs    43.7 g protein   

Enjoy!
Recipe adapted from Allrecipes.

Roasted Red Pepper Soup

I had this wild hair the other day to challenge myself and do something I've never done in the kitchen before: roast red peppers and make some soup. I've always been a fan of the roasted red pepper soup from Trader Joe's so I figured I could replicate the yummy soup and make it a little healthier on my own by using fresh ingredients. There's nothing like a nutrition-packed soup that makes me happy. I didn't know what the nutritional stats were when I made this soup, and knowing I got 4 servings out of this surprised me that it was only 83 calories per serving! I served it with a nice vegetable salad on the side and was more than satisfied for dinner. I think it had something to do with the nice flavor punch in the soup. I hope you enjoy this as much as I do.

Roasted Red Pepper Soup
4 SERVINGS
PREP: 10 minutes           COOK: 70 minutes            READY IN: 80 minutes


  SIMPLE         HEALTHY      YUM
pic name       pic name      pic name

INGREDIENTS


  • 4 large red peppers
  • 2 large garlic cloves, minced
  • 1/2 medium onion, diced
  • 2 tomatoes, diced
  • 32 ounces chicken broth (or vegetable broth would work too)
  • 1/4 cup milk (optional, but I like my soup a little creamy)
  • 2 teaspoons lemon juice
  • 1 teaspoon salt
  • 1 teaspoon lemon pepper
  • 1/2 teaspoon black pepper

DIRECTIONS


  1. Roast the red peppers. If you have never done this, it's okay. I hadn't either and it's really very simple. Cut the peppers in half and deseed the peppers. Lay them down on a baking sheet lined with parchment paper, cut side down. In an oven set to 400ºF, bake the peppers for 15-18 minutes. The peppers should be charred (about 1/2 of the pepper will be black) and then they're ready to be pulled out of the oven.
  2. Put the peppers in separate dish and cover for 15 minutes. Peel the outside skin off the peppers and dice.
  3. In a large pot, sauté the garlic and onion until tender, about 5-7 minutes. 
  4. Add the red peppers, tomatoes, and chicken broth. Bring to a boil and simmer for 30 minutes.
  5. Blend in a blender until smooth.
  6. Place back on the stovetop and add milk, lemon juice, salt, lemon pepper, and black pepper. Simmer for 3 minutes.
  7. Serve in a bowl and top with cheese if you'd like. Mozzarella or goat cheese are great options.

NUTRITION FACTS


(not including a cheese topping)

    1 1/2 cup serving    83 calories   2g fat   10.3g carbs    6.8g protein    6g sugar   

Enjoy!
Recipe adapted from Closet Cooking.

Monday, November 25, 2013

Dark Chocolate Pomegranate Coconut Bark

That's a lot of goodness in one title.

Any dark chocolate lovers out there? If so, this is the treat for you! Even if you're a milk chocolate person, like myself, its still a great treat to get your sugar fix in but in a healthier way. Have you ever tried the Brookside dark chocolate covered pomegranates or blueberries? Take my word, they are to die for. I could eat the entire bag. I love the combination of pomegranate and chocolate so when I found this recipe it just spoke to me. The 'pop' of pomegranate when you eat it just makes it that much better. This is a great snack to take to your fellow dark chocolate friends for the holidays, or eat the entire cookie sheet and not feel TOO guilty about it (well, when compared to a bowl of cookie dough... :)


Dark Chocolate Pomegranate Coconut Bark
12 SERVINGS 
PREP: 10 minutes (mostly de-seeding pomegranate)  COOK: 2 minutes   READY IN: 4-8 hours

  SIMPLE         HEALTHY      YUM
pic name       pic name      pic name

INGREDIENTS


  • 10 oz. bag dark chocolate 
  • 1/4 cup coconut flakes, sweetened
  • 1 cup pomegranate seeds

DIRECTIONS


  1. Melt chocolate as directed on packet, either by microwave or double boiler. 
  2. Mix coconut flakes into melted chocolate. 
  3. On a parchment paper lined cookie sheet pour your chocolate out and evenly spread it over the parchment paper until thin.
  4. Sprinkle pomegranates on the chocolate. Press down lightly so that they stick in the chocolate better when its dried. 
  5. Let it harden at least for a few hours or overnight so it's easier to break into pieces. 
  6. Break up into chunks and serve.

NUTRITION FACTS


   1 serving   150 calories  10g fat  17g carbs   2g protein   12g sugar   

Enjoy!
Recipe adapted from paleomg.com

Recipe Refresh: Pita Joes (...or Lightened-Up Sloppy Joes)


Okay, I realize that Sloppy Joes are not the first thing that comes to mind for the week of Thanksgiving, but here's how I see it: The crazy holiday season is descending. Soon you will be running ragged between shopping, holiday parties, and winter travel. You and your children will be eating excesses of sugar, butter, and all sorts of holiday "goodness." On the nights you are home, you will be racking your brain for a quick and easy dinner that a) counteracts all of the junk you and your children will be eating and b) your children will gobble (no Thanksgiving pun intended!) right up. On those nights, you will thank me that you are prepared with this recipe up your sleeve.

I found this recipe in a cookbook from the American Heart Association. It takes all the goodness of sloppy joes and makes it healthier and tidier. It has less sugar, less sodium (by half!), and less fat (also by half!) along with having more fiber (double!), more protein, and (in my opinion) more flavor! My son (who is not a fan of meat) ate this up, no questions asked. And my husband and I were fighting over who got to have the leftovers. Seriously, what's not to love?


Pita Joes
4 SERVINGS 
PREP: 10 minutes           COOK: 20 minutes            READY IN: 30 minutes


  SIMPLE         HEALTHY      YUM
pic name       pic name      pic name

INGREDIENTS


  • 1 pound extra-lean ground beef
  • 2/3 cup chopped onion
  • 1 medium carrot, chopped
  • 1 medium zucchini, chopped
  • 1/2 tablespoon minced garlic
  • 1 (14.5-ounce) can no-salt-added diced tomatoes, drained
  • 1 (8-ounce) can no-salt-added tomato sauce
  • 1 tablespoon brown sugar
  • 2 teaspoons chili powder
  • 2 teaspoons Worcestershire sauce (I substituted steak sauce)
  • 1 teaspoon dry mustard
  • 1/8 teaspoon salt
  • 1/8 teaspoon pepper
  • 1/4 teaspoon liquid smoke (optional)
  • 4 whole-wheat pita pockets

DIRECTIONS


  1. In a large skillet, cook the ground beef, onion, carrot, zucchini, and garlic over medium-high heat until the beef is no longer pink (about 10-12 minutes). 
  2. Add in the remaining ingredients (minus the pita), reduce heat to medium, and cook for another 10 minutes. 
  3. Warm the pita (you can do this by wrapping them in a paper towel and placing them in the microwave for about 30 seconds), and cut each pita in half. Spoon 1/2 cup of the meat mixture into each pita half and serve warm.

NUTRITION FACTS


    2 pockets with 1/2 cup filling each   409 calories   8.0 g fat   54 g carbs    34 g protein    12 g sugar   


Original Recipe (from Taste of HomePass the Fresh Refresh Recipe
1 lb. ground beef
1 cup ketchup
2 Tbs. brown sugar
2 teaspoons Worcestershire sauce
2 teaspoons prepared mustard
1/2 teaspoon salt
4 hamburger buns
1 lb. extra lean ground beef
2/3 cup onion
1 carrot
2 zucchini
1 can tomatoes
1 can tomato sauce
1 Tbs. brown sugar
1 teaspoon Worcestershire sauce
1 teaspoon dry mustard
1/8 teaspoon salt
4 whole wheat pita pockets
1 sandwich has:
439 calories
16 g fat
1360 mg sodium
46 g carbohydrate
2 g fiber
27 g protein
1 whole pita pocket (2 halves):
409 calories
8 g fat
635 mg sodium
54 g carbohydrate
8 g fiber
34 g protein

Enjoy!
Recipe adapted from American Heart Association Healthy Family Meals.

Friday, November 22, 2013

Lightened-Up Zupas Garden Chowder Soup


Do you have loads and loads of zucchini left over from your summer gardens? I don't, but I wish I did. It's my favorite vegetable to cook with. You can make zucchini bread, muffins, brownies....the list goes on. Out of all of those delicious treats, this soup is my favorite way to incorporate zucchini into my meals. Yup, I said it...soup over treats!

Zupas has a specially place in my heart, but sadly this soup only comes out during the summer so I have to get my fix in while I can. The first week I tasted this I think I had it almost every day for the next 2 weeks. I just couldn't get enough. Summer is clearly over (insert crying), but my love affair with this dish is not, so... I brought it to my kitchen. My husband loves that it's easier on the wallet, and we get it all year round!! I've tried multiple recipes and this one is our favorite!


Zupas Garden Chowder
8 SERVINGS 
PREP: 10 minutes           COOK: 20 minutes            READY IN: 30 minutes

  SIMPLE         HEALTHY      YUM
pic name       pic name      pic name

INGREDIENTS


  • 1 tablespoon butter (I use Brummel & Brown yogurt spread)
  • 2 medium zucchini, diced
  • 1 medium onion, chopped
  • 2 tablespoons parsley
  • 1 teaspoon basil
  • 2 tablespoons flour
  • 3 cup water
  • 2 chicken bouillon cubes 
  • 1 teaspoon lemon juice
  • 1 can Rotel diced tomatoes, undrained
  • 1 can low fat evaporated milk
  • 1 can corn
  • 1/4 cup grated Parmesan cheese
  • 1 cup cheddar cheese, plus extra for garnish
  • salt and pepper to taste

DIRECTIONS


  1. In a 5 Qt pan (or larger) sauté zucchini, onion, parsley and basil in 1 tablespoon butter until vegetables are tender. 
  2. Stir in flour, salt and pepper. Gradually add in water. 
  3. Add the bouillon cubes and lemon juice. Bring to a boil. Cook and stir for roughly 2 minutes until it starts to thicken. 
  4. Add tomatoes, corn, and milk. Bring to a boil. Reduce the heat and let it simmer for 5 minutes, or until corn is tender. 
  5. Before serving, add in Parmesan and cheddar cheese. 
  6. Garnish with a little extra cheddar cheese and eat up! 

NUTRITION FACTS


    1 cup serving   171 calories   10g fat   15g carbs    14g protein    10g sugar   

Enjoy!
Recipe adapted from tasteofhome.com

Thursday, November 21, 2013

Recipe Refresh: Low Cal Green Bean Casserole


One of the dishes I love having on a Thanksgiving spread is the beloved Green Bean Casserole. My Grandma makes it like none other, and I think that has something to do with the fact that she uses her very own green beans from her garden - frozen and saved just for the feast. In an effort to maintain this dish's yumminess, but also keep it healthy by using only real food instead of canned, I made over this traditional dish and am very pleased at the results! As a comparison, I used Paula Deen's Green Bean Casserole recipe as this is pretty close to how my Grandma would make it.

I'd love to hear your thoughts in the comments below on your favorite Thanksgiving dish. I feel like it's so hard to choose. Is it the pie? The stuffing? The yams? Or does your family have "weird" traditions that you look forward to each year? For instance, my Grandma also serves duck meat each Thanksgiving. It's tradition, and I love it! 


Recipe Refresh: Low Cal Green Bean Casserole
10 SERVINGS 
PREP: 40 minutes           COOK: 35 minutes            READY IN: 75 minutes


  SIMPLE         HEALTHY      YUM
pic name       pic name      pic name

INGREDIENTS


  • 4 tablespoons olive oil, divided
  • 4 medium shallots, diced
  • 1 1/2 pounds fresh string green beans
  • 1 pound button mushrooms, sliced
  • 6 garlic cloves, minced
  • 3 cups milk (I used skim)
  • 3 tablespoons flour
  • 1/3 cup + 2 tablespoons Parmesan cheese, divided
  • 1/2 cup chopped parsley
  • 3/4 teaspoon sea salt
  • 1/2 teaspoon pepper

DIRECTIONS


  1. Preheat the oven to 375ºF.
  2. In a medium skillet, on medium-high heat, put a couple tablespoons of olive oil and sauté the diced shallots until they are golden brown and crispy. They should look nice and caramelized (it took me about 6 minutes to achieve this.) Place in a separate dish off to the side.
  3. In the same skillet, add a little more olive oil (about 2 tablespoons) and sauté the mushrooms until they are golden brown. This will take longer than the shallots, about 12 minutes. 
  4. Once the mushrooms are golden brown, add the garlic and thyme. Mix together for 1 minute in the skillet.
  5. Place the mushroom mixture in a separate bowl, off to the side.
  6. Mix together milk and flour until the flour is dissolved. 
  7. In a larger skillet, heat up the milk & flour mixture, stirring frequently, and bring to a simmer. Reduce the heat to med-low until the mixture thickens. This took about 15 minutes.
  8. Remove pan from heat, and add green beans, mushroom mixture, 1/3 cup Parmesan cheese, parsley, salt, an pepper.
  9. Spray a 2 quart casserole dish with cooking spray. Put the green bean mixture in the dish, top with the shallots and 2 tablespoons Parmesan cheese and cook in the oven for 30-35 minutes, or until golden on top and bubbling.

NUTRITION FACTS


    1 serving    161 calories   8.4g fat   15.1g carbs    9.5g protein    5.5g sugar   

Original Recipe (Paula Deen's)Refresh Recipe by Pass the Fresh
1/3 stick butter
1/2 cup diced onions
1/2 cup sliced fresh mushrooms
2 cups sliced green beans
3 cups chicken broth
1 (10 3/4-ounce) can cream of mushroom soup
1 (2.8-ounce) can French-fried onion rings
Pinch House Seasoning (salt, black pepper, garlic powder mixture)
1 cup grated Cheddar
4 tablespoons olive oil, divided
4 medium shallots, diced
1 1/2 pounds fresh string green beans
1 pound button mushrooms, sliced
6 garlic cloves, minced
3 cups milk (I used skim)
3 tablespoons flour
1/3 cup + 2 tablespoons Parmesan cheese, divided
1/2 cup chopped parsley
3/4 teaspoon sea salt
1/2 teaspoon pepper
Prep: 10 minutes, Cook: 30 minutes (Total: 40 minutes)Prep: 40 minutes, Cook: 35 minutes (Total: 75 minutes)
217 calories, 15g fat, 11.7g carbs, 8.4g protein, 1.8g sugar   161 calories, 8.4g fat, 15.1g carbs, 9.5g protein, 5.5g sugar  

Enjoy!

Recipe adapted from Kitchen Konfidence.

Wednesday, November 20, 2013

Banana Cream Pie Smoothie

Weekly occurrence: I go to the store. I buy a few bananas. I come home and eat one... the rest are brown before I know it. I can't just throw them away and I definitely can't make banana bread every week - so what do I do? Simple - make this delicious banana cream pie smoothie! This recipe caught my eye when I was looking for healthy alternatives to eating all that Thanksgiving pie. And let me tell you - this is a good one.

Banana Cream Pie Smoothie
3 SERVINGS 
PREP: 10 minutes           COOK: 0 minutes            READY IN: 10 minutes


  SIMPLE         HEALTHY      YUM
pic name       pic name      pic name

INGREDIENTS


  • 2 ripe bananas (Ripe bananas bring more flavor)
  • 1 cup low-fat vanilla yogurt
  • 1/2 cup vanilla soy milk (or low-fat milk)
  • 1 sheet graham crackers
  • 1 tablespoon nonfat dry milk
  • 1/2 teaspoon vanilla extract
  • 4-5 ice cubes
  • Graham cracker crumbs

DIRECTIONS


  1. Mix all ingredients together (besides graham cracker crumbs) in a blender. 
  2. Serve with crumbs on top

NUTRITION FACTS


    3/4 cup serving    171 calories   2.1 g fat   30.4 g carbs    7.4 g protein    19.4 g sugar   

Enjoy!
Recipe adapted from My Recipes

Tuesday, November 19, 2013

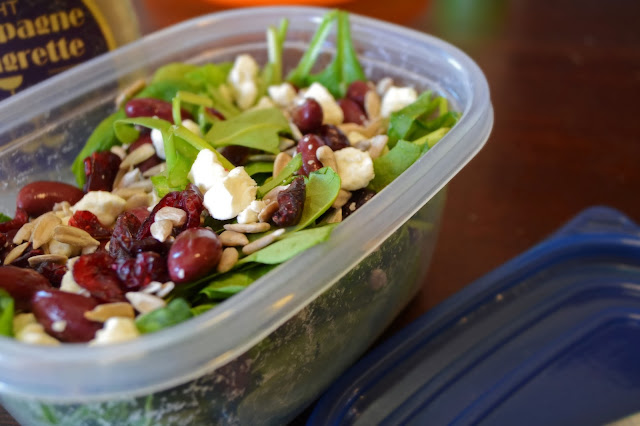
On-the-Go Lunch Salad

I've kind of debated about doing a "recipe" with this, since it's more of a set of ideas than a real recipe. But since about 50% of my lunches for probably the last 5 years consist of this salad (which I recently saw a variation of in a cookbook - they called it the "Hugh Jass" salad ... say it out loud!), I figured it was probably worth sharing...


As a working mom for several years I was always rushing to get myself ready and out the door, and did not have much time to prep a decently nutritious lunch. I didn't like to rely on eating out for lunch (both for cost and nutrition reasons), nor could I bring myself to eat uber-processed frozen meals. I discovered that I could quickly prep this salad either the night before or in the morning by putting everything but the dressing in a medium-sized (about 1 quart) ziploc container. Then I'd tote it and a bottle of dressing in my lunch bag to work, and at lunchtime all I had to do was pour a little dressing on, give the container a good shake, and I had a nutritious and filling lunch salad in less time than it took my coworkers to peel the cellophane off the top of their frozen entree!

Now that I'm a stay-at-home mom, my lunch salad has not fallen by the wayside. I find that I am still turning to it frequently for those days that I'm packing lunch for an outing with the kids or just need to fit something in quick so that I can get the kids down for nap time. Now the alternative I'm avoiding is daily repetitions of peanut butter and jelly, but the idea is the same. This gives me a quick, easy, and portable lunch that I can feel good about!

This "recipe" is constantly changing, with new combinations on a daily basis. I'm always looking for good ideas to liven things up ... Let me know what your favorite salad toppings are by leaving a comment!


On-the-Go Lunch Salad
1 SERVING
PREP: 5 minutes           COOK: 0 minutes            READY IN: 5 minutes

  SIMPLE         HEALTHY      YUM
pic name       pic name      pic name

INGREDIENTS


  1. Greens (2-3 cups) - this is the base of your salad, and is going to give you a ton of great nutrients. The more green, the better! 
    • Spinach - This is my go-to, mostly because it's so darn healthy and because it's easy to buy and store. 
    • Kale or other Mixed Greens also work great.
    • Other bite-size vegetables are good to throw in, if you have them on hand: 
      • frozen peas
      • broccoli spears
      • cauliflower florets
      • baby carrots
      • grape tomatoes
      • cooked squash cubes (If I have some cubes of butternut squash sitting around with nothing to do, these are awesome to throw in!)
  2. Protein (about 1/3 cup) - you'll need some sort of protein for the salad to be filling and give you energy through the afternoon.
    • Canned beans (super convenient!): Red (kidney) beans, black beans, garbanzo beans, white/cannellini beans - anything really works
    • Canned tuna or chicken
    • Cooked lentils
    • If I have leftovers of something, such as cooked falafels or cooked meat (i.e. rotisserie chicken) that can be cut up, I'll sometimes throw that in. 
  3. Salty something (1-2 tablespoons) - this is mostly for flavor.
    • Crumbled Feta - my absolute fav!
    • ..... ummm, I like feta so much I really don't have many other good ideas here!
  4. Sweet something (1-2 tablespoons)- again, this is mostly for flavor, as well as some nutritional value.
    • Diced apple 
    • Dried cranberries or raisins
  5. Crunchy something - I find that this isn't essential, but adds some nice texture. Plus, if you choose well, you can fit in some more protein here.
    • Nut pieces (walnuts, almonds, sunflower seeds ... any nuts work pretty well)
  6. Dressing (2 tablespoons) - I like light store-bought dressings because of their convenience and the great variety of flavors to match what I'm in the mood for. The ones I typically rotate between are Balsamic Vinaigrette (or other similar vinaigrettes) and Sesame Ginger (or similar Asian-style).

DIRECTIONS


  1. Combine your desired ingredients (except the dressing) in a portable container with a tight lid. 
  2. When ready to eat pour on 2 tablespoons of dressing, cover and shake vigorously. 
  3. Enjoy!

NUTRITION FACTS (calculated using my most common combo: spinach, kidney beans, feta, craisins, walnuts, and balsamic vinaigrette)


    3 cup serving    259 calories   11.8 g fat   27.1 g carbs    12.7 g protein    7.0 g sugar


Monday, November 18, 2013

Pumpkin Chocolate Granola Bars

Unlike Cami, I'm still in full on pumpkin mode. I'm not ready to give it up just yet! Maybe after Thanksgiving?

(Yeah, probably not...)

I'm a pumpkin kind of gal and pumpkin pie spice is hitting the spot for me lately. The last couple weeks, I've been watching my calories. My littlest lady is finally eating all on her own (FREEDOM!!!!) and I'm ready to shed the last 10-15 pounds that I've held onto with all my three children. By the way, if you're looking for a great way to track your calories and activity, try the "MyFitnessPal" app. It makes tracking so simple and easy it barely takes any time at all, which is just my style! You can also set your own goals so you know exactly how many calories you should be taking in each day, and the breakdown of carbs, protein and fat (and more, if you want it). It's made all the difference in my life! I'm awesome at working out, but not so great at passing on the sweets.

I've noticed as I've been watching my eating habits that I would run for the cupboards after putting my little lady down for nap. The boys were (mostly) quiet and it was a time I could crouch down in the kitchen and have a little "me" time. Apparently that consisted of drowning myself in chocolate and any other sweet imaginable. Then around 2:30-3:00 p.m., I would feel so tired (go figure!). That sugar was giving me an all-time low and that's usually when I'd reach for the caffeine, but since I've kicked that for over a month now, I was left to analyze how I could put better energy boosting foods in my body instead of sugar, sugar, sugar.

This is what I came up with... Pumpkin granola bars. They leave my sweet tooth feeling satisfied, but don't give me a sugar hangover. They are a great source of energy and tide me over until dinner time (and keep me out of the kitchen cupboards!). And as added bonus, my entire family gives these a two thumbs up!


Pumpkin Chocolate Granola Bars
10 SERVINGS 
PREP: 10 minutes           COOK: 30 minutes            READY IN: 40 minutes


  SIMPLE         HEALTHY      YUM
pic name       pic name      pic name

INGREDIENTS


  • 1/2 cup pumpkin puree
  • 1/2 cup applesauce
  • 1/3 cup honey
  • 1 teaspoon vanilla
  • 3 cups rolled oats
  • 1/2 teaspoon pumpkin pie spice
  • 1 teaspoon cinnamon
  • 1/2 teaspoon salt
  • 1/2 cup 60% cacao chips, chopped
  • 2/3 cup sliced almonds

DIRECTIONS


  1. Preheat oven to 350ºF and grease an 8x8-inch baking pan. Set aside.
  2. In a medium bowl, combine pumpkin puree, applesauce, honey, and vanilla. Stir until smooth.
  3. Add in the oats, pumpkin pie spice, cinnamon, and salt. Stir until mixed together.
  4. Stir in cacao chips and almonds.
  5. Evenly press oat mixture into greased pan. Bake for 30 minutes, or until golden brown. The pumpkin keeps the bars moist so make sure they are golden, you don't want to under-bake them. 
  6. Let cool for 30 minutes and cut into 10 even granola bars.

NUTRITION FACTS


    1 granola bar    236 calories   8.8g fat   39.6g carbs    6.5g protein    17g sugar   

Enjoy!
Recipe inspired by Sally's Baking Addiction.

Low-Sugar Cranberry Salsa


I warned you that cranberries were coming! When fresh cranberries start appearing on produce shelves this time of year, I can never resist buying bags of them to try out new ways to use the tart red berries. They are such a beautiful fruit, and even though they have none of the sweetness of a typical berry, they are one of those awesome ingredients that can take you in so many directions. I love adding them into sweet things like cookies or scones. They add a fantastic pop of flavor to my morning oatmeal. They are wonderful in savory dishes and salads. And of course I love including them in my fruit smoothies. Here, I decided to take them in the spicy direction, and I'm loving the result! Instead of your traditional cranberry relish, this cranberry salsa is simultaneously sweet, tart, and full of spicy zing (which you can adjust according to your "heat tolerance" - I'll admit, I love to turn up the spice). It was fantastic served with sweet potato corn chips, as well as with cinnamon-sugar pita chips. And since I'm kind of one to push the envelope when it comes to all the traditional Thanksgiving flavors (i.e. salt, pepper, and butter) ... I'm positive it would also be an exciting substitute for cranberry relish on your Thanksgiving turkey (though I can't promise your grandmother would approve).


Cranberry Salsa
10 SERVINGS 
PREP: 10 minutes           COOK: 0 minutes            READY IN: 10 minutes


  SIMPLE         HEALTHY      YUM
pic name       pic name      pic name

INGREDIENTS


  • 2 cups fresh cranberries
  • 2 green onions, chopped
  • 1/2-1 jalapeño, seeded and finely chopped (depends on how strong your jalapeño is, and how hot you want it)
  • 1/2 cup chopped cilantro
  • 1 apple, finely chopped (I used a Gala)
  • 1/8 teaspoon stevia extract (or about 1 teaspoon honey or sugar)
  • 2 tablespoons lime juice
  • 2 tablespoons orange juice

DIRECTIONS


  1. Place half of the cranberries, chopped green onions, jalapeño, and cilantro in a food processor. Blend until all are finely diced, then add in the remaining of each ingredient and pulse the food processor a few more times. You should have a nice mixture, with everything diced, but not completely pureed. 
  2. Transfer to a medium-sized bowl with the diced apple pieces. Stir in the sweetener, lime juice, and orange juice. Mix well.
  3. Serve with your preferred chips ... or over your turkey!

NUTRITION FACTS


    1/4 cup serving    23 calories   0.1 g fat   6.2 g carbs    0.2 g protein    3.2 g sugar   

Enjoy!

Friday, November 15, 2013

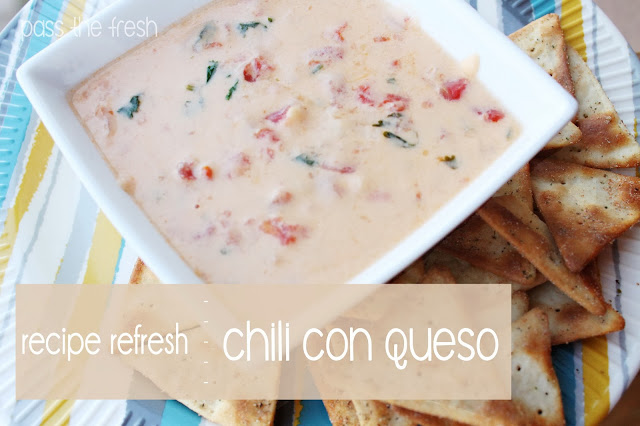
Recipe Refresh: Chili Con Queso


I love a good challenge, and these recipe refreshes do just that. I've always found ways to make recipes healthier by adding in the reduced or non-fat ingredients. My husband is probably sick of it, but he'll thank me later, he just doesn't know it yet! :)  I'm a sucker for cheese dips, but knowing how much fat and calories they have just isn't appetizing to me. So I decided to "lighten" up one of the best dips, chili con queso! I can't test to see if my baby likes it yet, but it's been husband approved.


Chili con Queso
10 SERVINGS 
PREP: 5 minutes           COOK: 8 minutes            READY IN: 13 minutes


  SIMPLE         HEALTHY      YUM
pic name       pic name      pic name

INGREDIENTS


  • 1 tablespoon butter (I used Yogurt Based Brummel and Brown)
  • 1 tablespoon chopped onion
  • 1 - 10 oz. can Ro-tel tomatoes with green chilies
  • 1/4 cup cilantro, chopped
  • 2 cups lowfat evaporated milk
  • 1/2 cup nonfat plain greek yogurt
  • 8 oz. cheddar cheese, shredded

DIRECTIONS


  1. In a medium sauce pan, over medium heat, melt the butter. Saute the onion and tomatoes until tomatoes start to break down, about 5 minutes. 
  2. Add in cilantro, evaporated milk, and greek yogurt. Stir to combine. 
  3. Add in cheese and stir until it is melted. 
  4. Serve warm with your favorite chips or crackers.
*Best if kept warm when serving so it doesn't 'harden' up

NUTRITION FACTS


  1/4 cup   108 calories  5g fat  6g carbs   10g protein   1g sugar   

Enjoy!
Recipe adapted from allrecipes.com

Thursday, November 14, 2013

Calabacitas con Elote (Zucchini with Corn)

Fall seems to be the time of year I crave colorful dishes. This one doesn't disappoint! It's a beautiful dish that would be perfect at any Thanksgiving dinner table. It's also perfect if you need a great vegetarian option for yourself, friends, or family. Just add some black beans to this recipe, and it will be a one-dish wonder. Or, feel free to add a little shredded chicken or turkey if you are meat-friendly and this can also be an all-in-one dish for dinner or lunch.


Calabacitas con Elote (Zucchini with Corn)
8 SERVINGS 
PREP: 20 minutes           COOK: 20 minutes            READY IN: 40 minutes


  SIMPLE         HEALTHY      YUM
pic name       pic name      pic name

INGREDIENTS


  • 2 tablespoons olive oil
  • 5 small zucchini, sliced
  • 1 cup frozen corn
  • 1 ripe vine tomato, diced
  • 1 jalapeno pepper, minced
  • 4 cloves of garlic, peeled and pressed
  • Sea salt, to taste
  • 2 teaspoons lemon pepper
  • 1 teaspoon cumin
  • 1 tablespoon raw blue agave sweetener
  • 1 lime, juiced
  • Handful of fresh cilantro, chopped
  • Lime wedges for serving

DIRECTIONS


  1. In a large skillet, heat the olive oil.
  2. Saute the zucchini for about 5 minutes, or until it turns a nice golden brown color.
  3. Add the corn, tomato, jalapeño, garlic, sea salt, lemon pepper, cumin, agave sweetener, and lime juice. Stir to combine. 
  4. Cover and cook on meduium heat for about 15 minutes, or until the veggies are tender, yet still crisp.
  5. Serve topped with fresh cilantro and lime wedges on the side.

NUTRITION FACTS


    1 serving    75 calories   3.9g fat   10.6g carbs    1.8g protein    4.2g sugar   

Enjoy!
Recipe adapted from Gluten Free Goddess.

Printfriendly

Related Posts Plugin for WordPress, Blogger...